Sunday, April 28, 2013

coconut oil

As a chef, I'm always on the hunt for hot new products to experiment with in the kitchen; as a culinary educator I'm always eager to share my discoveries. My passion for whole foods runs deep, and I endeavor to show people how to harness the power of real food for everlasting health and vitality. So when I discovered coconut manna, I knew I couldn't keep it to myself.


You see, all coconut products are nutritional powerhouses; they're antibacterial, antifungal and antimicrobial, being able to clean our bodies from the inside out, and coconut oil has always been the longstanding favorite. The accolades are well deserved, yes, but there's a new kid on the block: coconut manna, also known as coconut butter.


Coconut oil is created by pressing the coconut meat and extracting the oil, therefore separating the fiber from the oil. Manna, on the other hand, is made by blending the meat of the coconut until a smooth, velvety texture is achieved. 

In recent years we've come to understand that the medium-chain fatty acids in coconut oil are beneficial to the body; they're easier to metabolize, don't become excess weight as readily as other fat, and are said to have positive effects in the treatment of some cancers and in keeping our immunity strong. When all the aforementioned health benefits associated with coconut oil are combined with the benefits of consuming a diet rich in fiber, we now have another amazing coconut product to add to our whole foods pantry.


While coconut oil hardens at room temperature, coconut manna retains a malleable texture. Due to its thickness, coconut manna is perfect for thickening soups and sauces, but unlike coconut oil, manna won’t leave your soup or sauce greasy.

You can find coconut manna at most organic grocery stores; however, for the DIYer in all of us, we can very easily make it ourselves!

Ingredients:
  • 1 cup unsweetened, organic coconut flakes

  • 1 cup warm water (optional)

  • High powered blender such as a Vitamix or a food processor


Directions:

Soak the coconut in the warm water for 15 minutes; this is to soften the membranes, however, this step can be skipped if you are using a Vitamix, but highly recommended for those using a food processor.


Drain, and discard water.


Blend. If you're using a Vitamix, use the stamper while blending on HIGH for 2-4 minutes; for the food processor, you'll blend for approximately 10-12 minutes. For both methods, halfway through, use a spatula to scrape down the sides. This ensures that all the coconut gets incorporated. You'll know it is finished when it looks smooth, like white butter.

 Store in an airtight container in the fridge for up to three weeks.

Friday, April 26, 2013

corn soup


pb that chicken


INGREDIENTS (makes 4 servings):
8 skinless chicken thighs fresh ground black pepper
3/4 cup mild salsa

1/3 cup smooth peanut butter
2 tbsp lime juice
1 tbsp reduced-sodium soy sauce or fish sauce
2 tsp grated fresh ginger

1/4 cup chopped fresh cilantro lime wedges
DIRECTIONS:
Season chicken with fresh ground black pepper and place in slow cooker. in a medium bowl, combine remaining ingredients except cilantro. Pour over chicken. Cover and cook on low for eight hours. Using a slotted spoon, remove chicken and place on serving platter. Pour sauce over chicken. Garnish with cilantro and lime wedges. Serve with cooked brown jasmine rice, steamed green beans, and pineapple.
NUTRITION FACTS (per serving): 302 calories, 25g protein, 10g carbs, 20g fat, 4g saturated fat

Wednesday, April 24, 2013

stir fry


For the sauce: 

• 1 tbsp Braggs Liquid Aminos or Tamari for GF
• 1 tbsp fresh lime juice

• 2 tbsp water
• 1 tsp (arrowroot healthier choice) or cornstarch
For the Stir Fry or use frying pan:

• 1 lb skinless, boneless chicken breast, sliced thin
• salt, to taste
• 1 tbsp rice bran oil, or canola
• 2 tsp fresh garlic, minced
• 1 tsp fresh ginger, grated
• 1 cup sugar snap peas
• 1 cup carrots, sliced diagonally
• scallions for garnish
Combine Braggs liquid aminos, lime juice, water and cornstarch in a small bowl, mix together and set aside.

Season chicken lightly with salt. Heat a large wok over high heat. When the wok is very hot, add half of the oil, then add the chicken. Stir fry, stirring occasionally until the chicken is cooked through and browned, about 3-4 minutes. With a slotted spoon, remove the chicken and set aside. Reduce heat to medium.

Add the remaining oil to the wok; add the garlic and ginger, stir for 20 seconds. Add the sugar snap peas and carrots, stirring over medium high heat until tender crisp, about 3-4 minutes.

Return the chicken to the wok, add the Braggs Liquid Aminos-lime mixture, mix well and cook another 30 seconds to one minute. Serve immediately and top with fresh scallions.
5 hours ago · Like · 2

Monday, April 22, 2013

protein cakes


Chocolate Jam-packed Protein Cake

Gluten free, Dairy free, Sugar free, Yeast free, Corn free, Grain free
Finally, an evening dessert I can feel good about eating. These grain-free, gluten-free cakes have 15 grams of protein, 6 grams of fiber, and under 100 calories. I know I’ll stay satisfied until bedtime and get my chocolate fix.
Yield: 1 cake
Servings: 1

Ingredients

  • 2 tbsp non-flavored hemp protein powder or other protein powder *see note
  • 1 tbsp cocoa powder
  • 1/4 cup egg whites
  • 1 tbsp unsweetened apple sauce
  • 10 drops liquid stevia or 1/2 tbsp honey or other sweetener

Directions

  1. Preheat oven to 375F.
  2. Combine all ingredients in a small bowl and mix until fully incorporated.
  3. Drop mixture into a ~250mL (1 cup) oven safe ramekin. I purchased a bunch at Superstore for $1 each!
  4. Place in the preheated oven and bake for 20-25 minutes, or until a toothpick inserted comes out clean.
note: If you have chocolate protein powder, replace the hemp protein and cocoa powder with 3 tbsp protein powder.
calories: 98 | fat: 1.8g | carbohydrates: 9g | fiber: 6g | sugars: 2g | protein: 15g
[/print_this]
[print_this]

Vanilla Jam-packed Protein Cake

Gluten free, Dairy free, Sugar free, Yeast free, Corn free, Grain free
Bake a couple of these cakes on the weekend, freeze, and grab when you need them.
Yield: 1 cake
Servings: 1

Ingredients

  • 3 tbsp non-flavored hemp protein powder or other protein powder *see note
  • 1/4 cup egg whites
  • 1 tbsp unsweetened apple sauce
  • 1/2 tsp pure vanilla extract
  • 10 drops liquid stevia or 1/2 tbsp honey or other sweetener

Directions

  1. Preheat oven to 375F.
  2. Combine all ingredients in a small bowl and mix until fully incorporated.
  3. Drop mixture into a ~250mL (1 cup) oven safe ramekin. I purchased a bunch at Superstore for $1 each!
  4. Place in the preheated oven and bake for 20-25 minutes, or until a toothpick inserted comes out clean.
note: If you have vanilla protein powder, replace the hemp protein and vanilla extract with 3 tbsp protein powder.
calories: 117 | fat: 1.6g | carbohydrates: 8g | fiber: 6g | sugars: 2g | protein: 17g
[/print_this]


applesauce


Here are Gabby's instructions for her homemade applesauce:

- Cut apples up into small chunks

- Place in a pot and cover apples with a little water

- Add Cinnamon and Vanilla

- Boil water and cook for a few minutes until apples are tender

- Mix all in a blender and eat!

- Store it in the fridge

Follow TreeHouseOhm on Instagram for more!

Wednesday, April 17, 2013

cashew cream


To make savory cashew cream:
  • 1 cup raw cashews
  • ½ cup water
  • Juice of 1 lemon
  • Splash of Apple Cider Vinegar
  • 1/2 tsp sea salt
To make sweet cashew cream:
  • 1 cup raw cashews
  • ½ cup water
  • 4 tbsp raw agave nectar or maple syrup (or a couple of pitted Medjool dates)
  • ½ tsp pure vanilla extract
  • Dash sea salt
The method for both versions is the same:
 
1. Soak cashews in a bowl of water in the fridge overnight, then drain and rinse.

2. Place all ingredients in a blender and blend at high speed until smooth and creamy.
 
And now for the fun part! 

7 ways to enjoy cashew cream

SAVORY

1. Add sun-dried tomatoes or pesto to the savoury mix and use it as a spread on wraps or crackers.

2. Use it as a base for deliciously creamy soups, like this cashew cream of mushroom soup


4. Add a little oil or vinegar to make a creamy salad dressing. Or try whizzing up a large avocado; 2 tbsp lime juice and ¼ tsp ground cayenne pepper with the savory cream and using it as a dressing on a baby potato salad.  You’ll be the most popular person at the party, guaranteed.   
 
SWEET

5. Blend it into decadent and healthy smoothies – like this dreamy Mint Choc ChipSmoothie,pictured above.

6. Use it to make healthy, cholesterol-free ice-cream! This raw red velvet cake ice cream is sure to please!

7. Stir it through a small bowl of frozen berries for an instant summer treat.

Experiment with other flavours and ingredients to create your own variations. The options are endless!  

Monday, April 15, 2013

marinara sauce


asic Marinara Sauce

To print, use the green print button below
2  yellow onions, peeled and diced (about 2 cups diced)
2 Tbsp olive oil
5-6 cloves of garlic, minced (about 2 Tbsp)
2 Tbsp dried herbs (basil, oregano, rosemary, thyme, etc)* mixed, total
1/2 cup red wine***
12 cups peeled and seeded fresh ripe tomatoes**
salt and pepper to taste
In a large soup pot, heat up the olive oil. Add the onions and cook slowly, on medium heat until they start to caramelize. They should be evenly brown and soft. Cooking them this way brings out the natural sweetness in the onions. Add the garlic and dried herbs and cook for 5 minutes. Deglaze the pan with the 1/2 cup of red wine and cook for 2 minutes more. Add the tomatoes and their juice and stir to combine. Bring to a simmer and cook on low, stirring occasionally for at least 2 hours, or longer depending on the water content of the tomatoes. The sauce should be thick with much of the water evaporated to concentrate the flavor (sometimes I let it cook 4-5 hours over a very low flame). Add salt and pepper to taste.
Cooking marinara sauce
*Dried herbs hold their flavor much longer than fresh herbs so when slow cooking. If you want to use fresh herbs, add them at then end of the cooking process, just before serving. Use  which ever of those herbs you prefer for a total of 2 Tablespoons.
**Start with 4-5 lbs of fresh, ripe, tomatoes. If you don’t have fresh tomatoes, you can use 2 (28 oz) cans of crushed tomatoes, 1 (28 oz) can of whole tomatoes and 1 (6 oz) can of tomato paste. When I use canned tomatoes, I always add a couple tablespoons of sugar to counteract the acidity of the canned tomatoes. I find I don’t have to add any sugar with the ripe tomatoes from my garden.
***Many of the comments below have asked “Do I have to use red wine?” The answer is no, but it does add to the flavor and if you’re going to have wine with dinner anyway, or have an open bottle, throw some in!
Yields about 2.5 quarts

Thursday, April 11, 2013

ja festival 2


Festival

stripe

Festival video recipe

Click on the video to watch Tracy cook some Festival or scroll down to see the picture recipe for Festival.

    
stripe

Festival recipe

Ingredients

Festival - Ingredients 1 1/2 cups flour
 3 tablespoons cornmeal 
 1 cup water 
 1/2 teaspoon salt 
 3 tablespoons sugar 
 1 teaspoon baking powder 
 1 teaspoon vanilla 


Cooking

Festival - Preparing the dry ingredients Sieve the flour in to a bowl and stir in the cornmeal, salt, sugar and baking powder


Festival - Preparing the liquid ingredients Add the teaspoon of vanilla to the cup of water


Festival - Working in the water Add a small amount of water in to the mixture, work the water in to the mixture with your fingertips.
 Keep adding small amounts of water to the mixture, when half of the cup has been added the mixture should resemble breadcrumbs.


Festival - The finished dough Keep adding water until the mixture becomes a firm dough which is only slightly sticky (you should not need to add the whole cup)
 If the mixture gets too sticky to work with, add more flour


Festival - Leaving the mixture to stand Cover the mixture and leave to stand for half an hour


Festival - Dividing in to 8 festivals Divide the mixture in to eight portions
 Knead each portion and roll it in to a small sausage shape


Festival - Coating in flour and cornmeal Cover each festival in a mixture of flour and cornmealIn a small bowl combine a 1/4 cup of flour and 1/4 cup of cornmeal.


Festival - Cooking Deep fry until golden brown - this should take about half an hour.


Festival - Serving Serve with any Jamaican dish. Festival goes very well with Jerk dishes and spicy fish recipes where the sweet festivals provide a deliciously complimentary taste


© 2006 Jamaica Travel and Culture .com

stripe 

Valid HTML 4.01 Transitional    Valid CSS!    email    Facebook Logo Share   

ja festival 1


Jamaican Festival
——————————————————————————–
Serving Size: 6
Ingredients:
1 cup yellow cornmeal
1 cup all purpose flour
2 tsp baking powder
1 tbsp sugar
1/2 tsp salt
oil for frying
Directions:
Mix all ingredients together, adding just enough cold water to make a stiff dough (about 3/4 cup).
Jamaican Festival
Knead and divide into six portions.
Roll each portion with your hands into a log shape and squeeze lightly to flatten.
Jamaican Festival
Heat oil in a skillet or wok and deep fry the festivals until golden brown, about 4 minutes each.
Jamaican Festival
Remove excess oil on kitchen towel before serving.
Jamaican FestivalJamaican Festival

Wednesday, April 10, 2013

protein pancake


Gina’s Nighttime No-Carb Pancake

7 Simple Ways To Improve Your Diet - Take a step toward your goal TODAY1 scoop protein powder
2 egg whites
1 tsp baking powder
Cinnamon, to taste
Mix all ingredients and cook on medium heat in a pan sprayed with non-stick cooking spray. Top off with a tbsp of almond butter.


Simple Protein Pancakes:
  • 1 Scoop Whey (flavor of choice, I used Vanilla)
  • 2 Egg Whites
  • 1/4 Cup Oats
  • 1/2 Large Banana (substitutions below)
  • 1 TB Unsweetened Vanilla Almond Milk
  • 1/8 teaspoon of Baking Powder
  • 1/2 teaspoon of Cinnamon (optional)
Directions:
Put all ingredients into blender or magic bullet and blend until smooth. Allow the batter to set for about 5 minutes. Heat up a skillet or pan and spray with non-stick spray. Pour batter onto skillet (batter makes 2-3 normal sized pancakes). Let it cook for about 2-3 minutes or until bubbles appear. Flip and cook for an additional 2-3 minutes until cooked fully.
Alternative Options:
If you aren’t a fan of banana, you can sub this for 1/4 cup pureed pumpkin, fat free plain greek yogurt or nonfat cottage cheese.
Top with whatever you want. I recommend a natural nut butter like almond butter or peanut butter. You could also top with fresh fruit, sugarfree jam, honey, coconut butter, maple syrup or sugarfree syrup. Get creative!

Sunday, April 7, 2013


Fry Bodi" (Stir-Fry Long Green Beans)

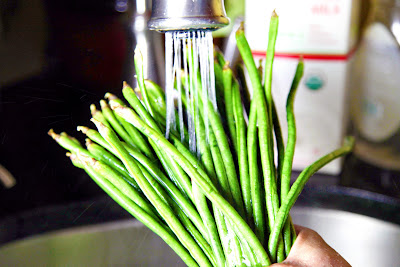
Long green beans are also known as bora, long padded cow peas, asparagus bean, snake bean or Chinese long bean, but in Trinidad we proudly call it bodi (pronounced bo-dee).  

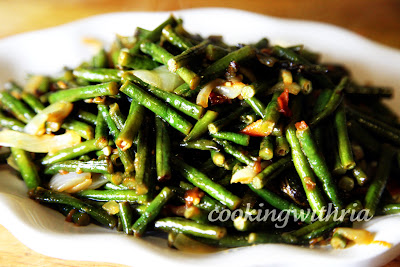
This recipe for “Fry Bodi” is actually long green beans stir fried with tomatoes, onions and garlic. Cooking bodi past the steaming point brings out the intense flavor of the green bean. It’s juicy, tender, yet crunchy. The onion which somehow gets caramelized in the process and the tomato add a burst of flavor and both lend a natural sweetness to the dish. Sometimes salted fish or potatoes can also be added to this recipe for variety.  

It always amazes me that in our Caribbean food culture we use the simplest ingredients to create the most delightful vegetarian dishes that even kids enjoy. Another favorite in my house with adults and kids alike,  I prepare “fry bodi” for a weekend breakfast and serve it with roti or fried bake. Sometimes I serve it as a veggie side to curried or stewed dishes.  

I always have to make a special trip to the Asian supermarket in Brooklyn or to Liberty Ave, Queens for these long green beans, but it is definitely worth the trek. I also use these long green beans in curries, fried rice or stir-fries(including chow mein).   

CWR's Trini Fry Bodi/Long Green Beans

1 bunch long green beans, washed, trimmed and cut into 2-inch pieces
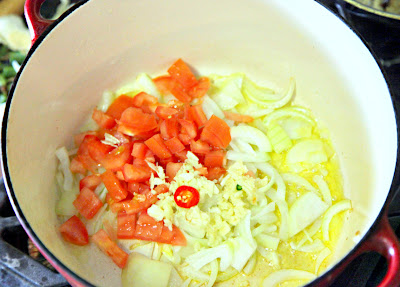
1-2 very ripe, medium tomatoes, diced
1 medium onion, sliced 
3 large garlic cloves, crushed
2 tablespoons extra virgin olive oil
Hot pepper-optional 
Salt-to taste

Simple ingredients-I only used one tomato..and a little piece of the hot pepper...
As you can see, I only use sweet vidalia onions in my cooking...they are heavenly...

Wash the long beans and drain..do both thoroughly.

Using a knife, trim the tops. I cut it all at the same time...to save time..
No chop, chop, chop here, just one chop!

Cut into 1-2 inch pieces. I grab all together using my hands (of course) and it's all over in a few slices!
I remember the older folks would sit and break each bodi into bite-size pieces. I can't see myself doing that!

Cut tomato/es, onion, pepper if using. Crush/pound garlic into very small pieces. 

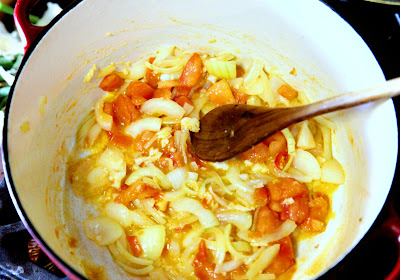
Heat 2 tablespoons olive oil in a heavy bottomed pot or large sauté pan over medium heat.  Add onion, tomatoes and garlic.

Stir fry for 2-3 minutes. 

Add long green beans (Bodi) and salt and stir fry over medium-high heat.
(I used two about two teaspoons of salt. The amount of salt may vary depending on the sweetness of the tomatoes and other factors...)
The bodi is ready when they begin to shrivel and turn brown about 10-15 minutes.

Serve hot or room temperature with roti, fried bake, rice or as a side dish....
You will really enjoy this "Fry Bodi".
Prepare this very simple, absolutely delicious dish today! ...or tomorrow...

buss up shot


Trinidad Paratha Roti (Buss up Shot)


Early Sunday mornings, the Trini in me heads straight to the kitchen to make fried bake or roti for my family. But since I am allergic to raw flour [it makes me sneeze, eyes swell and itch] my hubbie helps.  Cooking is not one of his fortes, so I developed this recipe for him. He has been using it for a few months and does a great job every time.  If he can do it, anyone can!!!!  And no I am not being dishonest about the flour allergy to get him to help me.

[P.S.....Don't be intimidated by the length of this post, I wanted to include as many photos and detailed instructions to make it easy for you!]

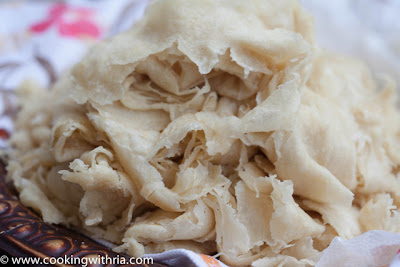
Paratha, also know as “buss up shot” is one of the various types of roti ubiquitous in Trinidad. It is called buss up shot because of its texture, appearance and similarity to a torn (burst) t-shirt. Leave it up to a Trini to come up with a name like that. 


It is usually the roti of choice served with various vegetables or meat dishes at weddings, religious gatherings(poojas/prayers) and other special occasions.  While growing up in Trinidad, it was customary for neighbors to gather before dawn on these occasions to knead hundreds of pounds of flour to make the parathas. Nowadays, it is becoming more customary to “place an order” for the sake of time and convenience instead of continuing this tradition.


From my experience, a  typical Trini husband had his meal delivered into his hands and it was at these gatherings I first witnessed men actually involved in the cooking process---including making roti. It shocked me every time. My nana(mother's father) was one of those master “roti makers” and when he gave up that role, my auntie Jang, his daughter, assumed that prestigious title. I was always front and center when the cooking for these special occasions took place and was always eager to look, learn and assist. [Future cookingwithria in training].

While I was in Trinidad earlier this year, I learned that one of my hubbie’s neighbors is a roti maker. I couldn’t wait to go over to her house to see her in action. Luckily for me, she was very willing to let me watch her in action---unlike many cooks I know who guard their recipes with their life.

This is an authentic recipe, the real deal, but when I make paratha at home, I decrease the amount of clarified butter to one teaspoon and use extra virgin olive oil to brush on the dough while cooking. I also make 5 rotis instead of four because of the size of my tawa. Two of these are usually enough for my family of four. The remaining dough is covered tightly and placed in the refrigerator for a day or two to enjoy with another meal. 

Home made paratha most definitely contains less fat than the ones we buy in the restaurant. It's no surprise they are usually melt in your mouth, stick-to-your-hips tender. The price we pay for goodness....


Trinidad Paratha Roti (Buss up Shot)

Serves 6-8

Ingredients

For kneading
4 cups organic unbleached all purpose flour
5 teaspoons aluminum free baking powder 
2 teaspoons salt
2 teaspoons raw brown sugar
2 cups lukewarm water
1 tablespoon vegetable oil

For filling the dough
4 tablespoons clarified butter (ghee) or organic butter
flour for dusting

To cook the paratha:
1/4 cup vegetable oil

*** (if using salted butter, reduce salt to one teaspoon)

Directions

Knead flour (Video coming soon)
In a large bowl, combine the flour, baking powder, salt and sugar. 
Gradually add water to make a shaggy soft dough.
Rub 1 tablespoon oil over dough. Cover with a cloth and let rest for 15-30 minutes. 


Filling and wrapping paratha


Divide the dough into 4 equal pieces. 


Press each dough into a circle using fingers or rolling pin. Using your fingers (or the bottom of a spoon) rub the surface of the dough with clarified butter. 


Sprinkle with flour. Cut dough downwards from middle of the top edge (12 o'clock) to the center of the dough. 


Roll clockwise into a cone.


Take the end of the dough and tuck it under the cone. 


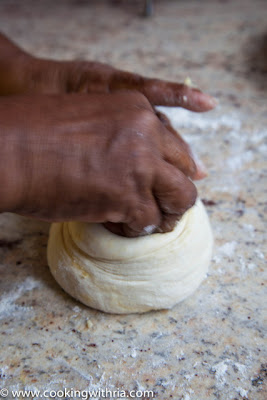
Push the tip of the cone downwards into the dough. 


Let it rest for 30 minutes. 


Cooking the paratha
When ready to cook the roti, heat tawa, dry cast-iron skillet or griddle over medium heat until hot. 

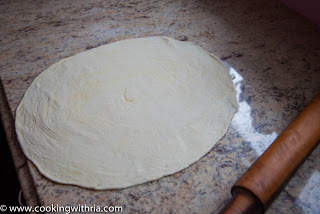
Working with one ball of dough at a time (keep the remaining dough covered) and using just enough flour to prevent sticking to counter and rolling pin, press dough into a small flat circle (about 4 inches). 


Using the rolling pin, roll the dough. Flip, rotate and roll until it becomes a thin, even 10 inch round, making sure that the edges are not thick. If you can't make it round, don't worry, it tastes just as good. 


Pick up the dough, place it on the palm of your hand and lay it on the tawa by quickly flipping your hand over the tawa. 


Drizzle or brush about 1/2 tablespoon oil over the surface of the roti. Flip.


Drizzle or brush oil over the other side. Flip.


Cook for a few seconds more, spinning roti slowly in a clockwise direction to allow the oil to spread and the roti to cook evenly, about 15 seconds. 


Turn and repeat on the other side, cook another 15 seconds. 


When roti is fully cooked, use a wooden spatula to beat the roti gently, accumulating the edges toward the center (start at the top and work your way down), until the layers separate. 


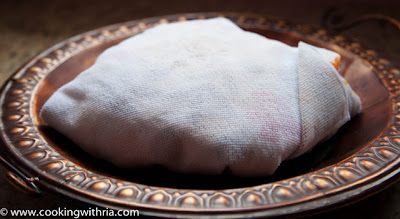
Remove the roti from the tawa and wrap the roti immediately in a clean, dry cloth. 


Repeat rolling out and cooking the remaining dough, stacking and wrapping the finished roti in the cloth. Once they are all cooked, let them rest in the cloth for 10-15 minutes before serving. During this time, they will steam themselves, becoming soft and pliable. 


Well-wrapped roti keep in the freezer up to a month. Thaw overnight in the refrigerator and reheat before using. 

This is how my babies and I love it when reheated....crispy/cripsy...


Hope I have inspired you to make this delicious paratha roti! Enjoy with some of my other recipes on this site including channa and aloobodicurried chickenstewed chicken, saltfish and tomatoes,baigan and tomato choka....or any of your favorite dishes....

Until next time,
Cooking with love,
Ria